Monday, June 22, 2009

Sesame Crusted Tuna with Ponzu Sauce

You know how sometimes a baguette can just be the tool to gorge on a particularly decadent dip? Or how a tortilla chip is really only there as the vehicle for some salsa? Recently, I had some tuna -- which was amazingly delicious in and of itself -- that I used almost exclusively to eat some ponzu sauce. This recipe was fantastic -- incredibly quick, easy, healthy and tasty. However, it was the sauce that really took it over the edge. I suggest buying the best tuna you can get -- I lucked out with some tuna on sale on Fresh Direct. I served this with some wasabi mashed potatoes.

The only tweak I made to the below recipe was to omit the orange juice, which I did not miss at all.

Sesame-Crusted Tuna with Wasabi-Ponzu Sauce

1 tablespoon chopped green onions
2 tablespoons low-sodium soy sauce
2 tablespoons fresh orange juice
1 tablespoon rice vinegar
1 teaspoon brown sugar
1 teaspoon grated lemon rind
2 teaspoons fresh lemon juice
2 teaspoons honey
1 1/4 teaspoons prepared wasabi paste
1 teaspoon grated peeled fresh ginger
2 teaspoons vegetable oil
4 (6-ounce) tuna steaks (about 3/4 inch thick)
1/4 teaspoon salt
3 tablespoons sesame seeds
2 tablespoons black sesame seeds
Sliced green onions (optional)

Combine first 10 ingredients, stirring with a whisk.

Heat oil in a large nonstick skillet over medium-high heat. Sprinkle tuna with salt. Combine sesame seeds in a shallow dish. Dredge tuna in sesame seeds. Add tuna to pan; cook 3 minutes on each side or until desired degree of doneness. Garnish with green onions, if desired. Serve tuna with sauce.

Makes 4 servings.

Saturday, May 30, 2009

No Knead Bread

At this point, I am sure almost everyone has heard of the no knead bread phenomena. After I finally got around to purchasing a dutch oven a few years ago, this recipe was one of the first I tried. The ingredients couldn't be more basic -- just flour, salt, instant yeast, and water. The hardest part of the recipe is the timing as it requires a lot of resting time to allow the yeast to do its work. Usually, an overnight rest is the way to go so starting the recipe the day before you intend to bake is a good technique. Once it has risen, the dough has a wonderful yeast-y smell. The dutch oven is invaluable because it can take and evenly distribute very high heat, as called for in this recipe.

When the bread finally comes out of the oven, it is beautifully golden and crusty. You have to let it rest for a few minutes, during which you will hear the bread crackle and settle. The final
product has a beautiful crust that isn't too hard and a springy interior with plenty of air pockets. This bread is probably as good, if not better, than most boules you may get at a bakery and you have the satisfaction of having baked it yourself! While this bread with butter is plenty good, I often make open faced sandwiches with it. The picture on the left is of an open faced sandwich consisting of goat cheese and grilled zuchinni and red onion, although the variations are endless. These make a great, light weekday dinner.

The recipe below is from Steamy Kitchen, which is slightly modified from the original recipe Mark Bittman got from Jim Lahey of Sullivan Street Bakery. I have also tried Bittman's speedier version of the recipe and find it to be almost as good.

No Knead Bread

Ingredients

3 cups bread flour (such as Harvest King bread flour)
1/4 tsp instant yeast
3/4 tsp kosher salt
1 1/2 cups warm water

Directions

1. Mix the dough: The night before, combine all the ingredients with a wooden spoon in a large bowl until a shaggy dough forms. Cover the bowl with a plastic wrap and allow it to sit on a countertop for 12 to 20 hours.

2. Shape and preheat: The dough will rise and become wet, sticky, and bubbly. With a wet spatula, dump the on a floured surface. Fold ends of dough over a few times with the spatula and nudge it into a ball shape. You can use your hands if you like, just keep your hands wet so that the dough does not stick. Generously dust a cotton towel (not terrycloth) with flour. Set dough seam side down on top of towel. Fold towel over the dough. Let it nap for 2 hours. When you’ve got about a half hour left, slip your covered pot into the oven and preheat to 450F.

3. Bake: Your dough should have doubled in size. Remove pot from oven. Holding towel, dump wobbly dough into pot. Doesn’t matter which way it lands. Shake to even dough out. Cover. Bake 30 minutes. Uncover, bake another 15-20 minutes or until the crust is beautifully golden and middle of loaf is 210F. Remove and let cool on wired rack.

Yields 1 loaf.

Monday, May 25, 2009

Flourless Peanut Butter Cookies

I love peanut butter and have gotten somewhat addicted to the fresh honey roasted peanut butter you can grind yourself on the nifty machines at Whole Foods. So, when I saw these cookies on Joy the Baker, I just had to try them. This recipe doesn't use any flour and results in the most peanut-buttery peanut butter cookies I have ever eaten. The original recipe calls for a full cup of sugar, half granulated/half brown sugar. I made two batches of these cookies. For the first batch, I used half granulated/half light brown pourable sugar. While still delicious, I thought the cookies were a little too sweet and the sugar masked the peanut butter flavor. For the second batch, I used the same sugars but cut the total amount by one-third cup. This resulted in a little less batter but much better cookies. The edited version of the recipe appears below. Joy the Baker recommends using natural peanut butter as it results in dough that holds itself together a little bit better and that is what I did. These cookies are definitely rich and when I brought them over in a gift box for my mother and mother-in-law for Mother's Day, the boxes were soaked with oil. However, both mothers absolutely loved the cookies.

Flourless Peanut Butter Cookies

Ingredients

1 cup natural chunky or smooth peanut butter
2/3 cup sugar, half granulated/half light brown pourable sugar
1 egg
1 tsp baking soda
1/2 tsp vanilla extract

Directions

1. Preheat oven to 350 degrees. Line a baking sheet with parchment paper.

2. Mix peanut butter and sugar until well-mixed. Add egg, baking soda, and vanilla extract and mix well.

3. Roll into walnut size balls and create a criss-cross pattern with a fork.

4. Bake for 10 minutes or until lightly browned. The cookies will be delicate so allow to cool for a few minutes before transferring from baking sheet.

Makes 14 - 18 cookies.

Sunday, May 17, 2009

Los Angeles

I didn't get to travel too much when I was growing up. My parents, outside of the odd road trip, would save most of their money to take my sister and me to India to stay for months with our relatives in Kolkata, which was certainly a valuable experience. However, I always longed to travel to other parts of the world (or even other parts of India) and romanticized the backpacker lifestyle. While I never quite got to do the backpacker thing, I did start travelling fairly regularly as soon as I started working. Unfortunately, this blog was not in existence when I had my adventures (food-related and otherwise) on my trips and recently, my husband and I have curtailed our travelling for various reasons. However, I was fortunate enough to be sent to Los Angeles for work a few weeks ago and we decided to make a mini-vacation out of the trip.

The first day was filled with work for me but my husband walked around downtown LA during that time. He chose Philippe for his lunch, an old-timey restaurant that claims to have invented the french dip sandwich. Despite the long lines, he thought the sandwich was completely worth it. He was even thoughtful enough to get me a jar of Philippe's famous hot mustard, which I have yet to try.

The trip started to feel like a vacation for me only when we ran into the cutest bakery called Vanilla Bake Shop right near our hotel in Santa Monica. We loved it so much that we went back there a second time. On the first visit, I tried the most decadent bite-size peanut butter chocolate tart. But, the shop seems to be best known for its cupcakes and the best way to try several flavors is to take advantage of the 3 mini-cupcakes for $5 deal. We tried a red velvet, a black & white, and a vanilla cupcake. All three were mouthwateringly good and super moist and 3 mini-cupcakes were plenty for an afternoon snack with a cup of coffee.


Our first real dinner in LA was at Joe's, a restaurant in Venice Beach that specializes in farm-fresh, seasonal fare. I would describe the menu as New American. Although I don't remember the exact descriptions of each of everything we ate, I remember the stand out dishes were a rich mushroom ravioli appetizer and a seared duck breast with lentils main course.

We finally were able to enjoy a leisurely brunch on our second full day, when we headed to Blue Plate in Santa Monica. It was a small, bright restaurant that was packed for brunch even on a Friday morning. The food was very fresh and served in extremely generous portions. Both my husband and I got variations on the scramble, which was essentially scrambled eggs with a choice of 4 add-ins. The dinner menu, which was scrawled on a blackboard on the wall, also seemed to include some interesting choices using seasonal ingredients.

Of course, no trip to California is complete without some burgers. On our quest to try the best California burgers, we first hit In-n-Out burger at the Westwood location. Having done our research beforehand, we knew to order our burgers and fries "animal style," which sounds frightening but just really means that your burger and fries will be smothered in a mix of cheese, sauce, and sauteed onions. While the burger was certainly good, it was nowhere near as good as I thought it would be from having heard all the hype. Much more satisfying were the burgers at Fatburger, which also has several locations including one conveniently located on Santa Monica's 3rd Street Promenade. The Fatburger was juicy and full of beefy flavor. Both burgers were California-style in that they were relatively flat patties and not the bigger and more loosely packed burgers one usually finds in New York.

Our second sit-down dinner was a point of much discussion and we finally settled on Jar, a chophouse in West Hollywood. The restaurant was decorated, I believe, to invoke a chophouse from the 1940's. I found the decor to be, frankly, a little oppressive as the walls were all dark wood and the furniture struck me as a little heavy and stuffy. The food, also, was only ok in my opinion. My husband got what was essentially a modern twist on Salisbury steak, which was very good. However, my coq au vin was seriously oversalted, which I think is a fatal mistake for a kitchen in a pricey restaurant to make.

Because we did not feel like having another heavy brunch on our last day in LA, we decided to graze at the Farmer's Market in West Hollywood. The market is year-round and the emphasis seems to be on prepared foods rather than vegetables and fruits as in the Union Square market in New York. While I munched on a perfectly good chocolate chip scone from one of the bakeries in the market, my husband hit the jackpot with a chicken taco and potatoes mashed with poblanos at Loteria Grill, a Mexican foodstand. It was our first taste of California Mexican food on this trip, which we loved so much that we decided to hit Border Grill in Santa Monica for our last dinner. Border Grill was a huge, bustling restaurant that had just the festive mood we needed to cap off our trip. Everything we tried, from the traditional tamale assortment and Chile Relleno to the less traditional gaucho steak, was fantastic. We knew we had made the right choice as soon as we were served with an assortment of fresh salsas served with fresh tortilla chips. I find California Mexican food to be more authentic than what you normally find in New York, but somehow more tasty than what I had when I actually went to Mexico!

While I had some mixed feelings about LA as a whole -- great weather, quirky characters, but a serious lack of architecture and a troublesome car culture -- the food was certainly a highlight.

Saturday, April 11, 2009

Strawberry Blueberry Bread

I only recently started eating breakfast regularly. In the past, I stumbled out of bed, rushed to the subway, and was lucky if I could grab a cup of coffee at work. These days, I try to get up a little earlier to have a somewhat leisurely breakfast with my husband, which I find makes the impending work day seem the slightest bit more bearable. Lately, however, I have become very bored with my usual bowl of cereal or toast. This strawberry/blueberry bread was the perfect thing to break up my routine. Given the amount of sugar and butter in this recipe, calling this bread may strain the definition of "bread," but it is perfect toasted and slathered with a dab of butter. It reminds me of a Spring version of the Pumpkin bread I made in the winter. I used some leftover strawberries and blueberries but other berries, such as raspberries would be just as good.

Strawberry Blueberry Bread

Ingredients

2 cups all-purpose flour
1 tsp baking powder
1 tsp baking soda
1/2 tsp salt
1/2 cup (1 stick) butter
1 cup sugar
1/2 tsp pure vanilla extract
1 1/2 tsp lemon zest
2 eggs
2 Tbsp sour cream (I used fat free sour cream)
1 cup crushed fresh strawberries, blueberries, and/or raspberries

Directions

1. Preheat oven to 325F. Spray or grease a loaf pan.

2. In a medium bowl, whisk together flour, baking powder, baking soda, and salt.

3. In a large bowl, cream together the sugar, butter, and vanilla until light and fluffy. Beat in eggs one at a time, beating well after the addition of each egg. Mix in the flour and sour cream. Fold in the crushed berries and lemon zest.

4. Spoon the batter into the prepared loaf pan. Bake in the center of the oven for 55 to 60 minutes or until a cake tester inserted into the center of the loaf comes out clean.

5. Cool the bread for 20 minutes in the pan. Invert the loaf onto a wire rack and cool completely.

Saturday, April 4, 2009

Chocolate Chip Cookies

If I had to pick my favorite desserts, the humble chocolate chip cookie would definitely be in my top five. I'm not too picky either -- I have been known to grab the sad looking chocolate chip cookies that always seem to appear on the dessert trays at work meetings. However, I do know a good chocolate chip cookie when I find one. Recently, my husband and I stumbled upon Jacques Torres' chocolate outpost in Tribeca and along with the requisite Wicked Hot Chocolate (hot chocolate with a touch of spice) we had the most amazing chocolate chip cookie in recent memory. It was gigantic (one was plenty for both of us) and was just oozing with chocolate; you even have the option of getting it warmed up by the staff! A recent NY Times article that made waves in the food blog world mentioned Jacques Torres' secret to the oozing chocolate in this cookies -- he uses chocolate disks, which are larger than chips, that create a layer of chocolate in his cookies.

Baking chocolate chip cookies at home is always a tricky proposition. Most of the recipes I had tried in the past were all similar to the well known Toll House version -- they were tasty but all turn out too thin and crispy; nothing at all like the thick, chewy chocolate chip cookies that I enjoy from bakeries. I hit the jackpot when I found this recipe, which is my go-to chocolate chip cookie recipe (at least until I try the NY Times recipe). It is the only recipe I have tried that results in thick, chewy cookies rather than thin crisp disks. The recipe even includes a brilliant method for getting large cookies with beautiful nooks and crannies -- you roll a 1/2 cup of the dough in your hands, pull it apart in half, and then place the halves on the baking sheet with the torn portion facing up. The one key change I made to the recipe is to use light brown pourable sugar rather than regular brown sugar. The one time I tried this recipe with regular brown sugar, the dough was too moist and the cookies came out too thin and crispy. These cookies may not be quite on the Jacques Torres level, but they are pretty darn good.

Chocolate Chip Cookies

Ingredients

2 cup plus 2 Tbsp all-purpose flour
½ tsp baking soda
½ tsp salt
12 Tbsp (1½ sticks) unsalted butter, melted & cooled until warm
1 cup light brown pourable sugar
½ cup granulated sugar
1 large egg plus 1 yolk
2 tsp vanilla extract
1½ cup semisweet chocolate chips

Directions

1. Preheat oven to 325°F. Line cookie sheets with parchment paper.

2. Whisk dry ingredients (except sugar) together; set aside. Mix butter & sugars until thoroughly combined. Beat in egg, yolk and vanilla until combined. Add dry ingredients & beat at just until combined. Stir in chips.

3. Roll scant ½ cup dough into ball. Holding dough ball in fingertips of both hands, pull into 2 equal halves. Rotate halves 90 degrees and, with jagged surfaces facing up, place formed dough onto cookie sheet, leaving ample room between each ball.

4. Bake until cookies are light golden brown and outer edges start to harden yet centers are still soft & puffy (about 18 - 20 minutes). Cool cookies on sheets until able to lift without breaking.

Makes 18 or so large cookies.

Macaroni and Cheese

What goes better with fried chicken than macaroni and cheese? I have made macaroni and cheese in the past but this Martha Stewart recipe blew the old recipes I had tried out of the water. The recipe is for baked macaroni and cheese, rather than a stovetop version, and calls for a real cheese sauce starting with a bechamel sauce rather than Velveeta. It may sound strange but the ingredient that made the biggest difference was the cubed white bread that is scattered on top of the cheesey pasta right before baking. The bread cubes form a delicious crust and lend some needed crunch to the final product. I recommend this technique over topping with normal breadcrumbs, which always seems to create a crust that is a little too dry and separate from the rest of the dish.

Making this recipe also caused a light bulb to go off in my head about bechamel sauce -- namely, that making a bechamel sauce takes patience. In the past, after a few minutes of stirring, I would get bothered by the lumps in the sauce cased by the butter/flour roux and fish out the lumps, which usually resulted in a sauce that was too thin and watery. This time, I let the sauce simmer for at least 10 minutes while constantly swirling with a whisk. The sauce thickened up beautifully with nary a lump in sight. The below recipe is slightly altered from the original.

Macaroni and Cheese

Ingredients

4 tablespoons unsalted butter, plus more for casserole
3 slices white bread, crusts removed, cut into 1/4 inch cubes
2 3/4 cups milk (I used 1% milk)
1/4 cup all-purpose flour
1 teaspoon coarse salt, plus more for water
1/8 teaspoon ground nutmeg
1/8 teaspoon freshly ground black pepper
1/8 teaspoon cayenne pepper
2 1/4 cups grated sharp white cheddar cheese
1 cup grated Gruyère or 1/2 cup + 2 Tbsp grated Pecorino Romano cheese (I used Parmesan cheese)
1/2 pound elbow macaroni

Directions

1. Preheat oven to 375°F. Place the bread cubes in a medium bowl. In a small saucepan over medium heat, melt 1 tablespoon butter. Pour the melted butter into the bowl with the bread, and toss. Set the breadcrumbs aside.

2. Warm the milk in a medium saucepan over medium heat. Melt the remaining 3 tablespoons butter in a high-sided skillet over medium heat. When the butter bubbles, add the flour. Cook, stirring, 1 minute.

3. While whisking, slowly pour in the hot milk a little at a time to keep mixture smooth. Continue cooking, whisking constantly, until the mixture bubbles and becomes thick, 8 to 12 minutes.

4. Remove the pan from the heat. Stir in salt, nutmeg, black pepper, cayenne pepper, 1 1/2 cups cheddar cheese, and 3/4 cups Gruyère (or 1/2 cup Pecorino Romano); set the cheese sauce aside.

5. Cover a large pot of salted water, and bring to a boil. Cook the macaroni until the outside of pasta is cooked and the inside is underdone, 2 to 3 minutes. Transfer the macaroni to a colander, rinse under cold running water, and drain well. Stir the macaroni into the reserved cheese sauce.

6. Pour the mixture into a 8X8 casserole dish. Sprinkle the remaining 3/4 cups cheddar cheese, 1/4 cup Gruyère (or 2 Tbsp Pecorino Romano), and the breadcrumbs over the top. Bake until golden brown, about 30 minutes. Transfer the dish to a wire rack for 5 minutes; serve.

Makes 6 servings.

Friday, April 3, 2009

Fried Chicken

Up to about two weeks ago, I swore that I would never ever try to deep fry anything at home. I was less concerned about how bad fried food is for my health than I was about third degree burns, overflowing and spattering hot oil, and grease fires. My husband has a deep love for fried chicken (I am a pretty big fan as well) and has often begged me to make home made fried chicken. Although we found a few places in the city with pretty good fried chicken, nothing compared to the fried chicken my husband recalled eating after a night out on the town at a little known place in Queens called Palace Fried Chicken, or PFC (yes, really). He was convinced I would be able to replicate it at home. About two weeks ago, I decided to throw caution to the wind. Well, more accurately, after spending a few hours reading food blogs about how to make amazing fried chicken without burning the apartment down, I decided to try my hand at fried chicken. It seemed from everything I read that the key things to remember were: (1) soak the chicken in buttermilk for as long as possible to get very moist meat, (2) double coat the chicken to get a very crispy exterior, and (3) make sure the oil is neither too hot nor too cold.

The temperature of the oil is what made me the most nervous -- too cold and the chicken will get soggy, too hot and the chicken will burn before it cooks through. To make matters worse, I didn't have a thermometer that could have helped me if a recipe called for a particular temperature. So, I had to rely on the old fashioned test of flicking some flour into the oil to see if it immediately sizzled. The first two pieces I fried did come out slightly burnt because I waited a tad too long for the oil to heat up (it was smoking, which means I let it get too hot). However, I learned my lesson and discovered the key is to keep the heat between medium and medium-low, which seems counterintuitive. The chicken, when it hits the oil, should sizzle but not too ferociously. I also read that using butter or olive oil for deep frying is not ideal so I stuck to canola oil. Finally, you should not use too much oil in your frying pan because it could overflow. I used a wide shallow wok, which was ideal for frying 3 pieces of chicken at a time.

The second thing I learned is that soaking the chicken in buttermilk makes a huge difference. Although most recipes call for an overnight soak, I was only able to allow the chicken to soak for about 6 hours. Even after just 6 hours, the chicken was extremely tender and my husband claimed he could taste the buttermilk in the final product. A lot of recipes also call for brining the chicken. I followed a tip from Padma Lakshmi's book Tangy Tart Hot & Sweet (a gift from someone at work who overestimated my love of Top Chef; to be fair, a lot of the recipes look interesting) and soaked the chicken in salted buttermilk, which combines the two steps (although Padma Lakshmi uses milk rather than buttermilk).

The below recipe is an amalgam of tips, tricks, and suggestions from a variety of recipes. I have made fried chicken two times now and both times have been a resounding success. Now, I can't wait to try other deep fried goodies!

Fried Chicken

Ingredients

1 whole chicken, cut into eighths
2 cups canola oil

For Brine
2 1/2 cups buttermilk
5 tsp kosher salt
4 tsp hot sauce

For Coating
1 1/2 cup flour
1 tsp amchoor or dried mango powder (optional; you can find this easily in most Indian supermarkets)
1 tsp cayenne
1 tsp garlic powder
2 tsp kosher salt
1 tsp paprika
1 cup corn flakes, crushed
3 eggs, beaten in a shallow bowl

Directions

1. Mix the buttermilk, hot sauce, and salt together in a large bowl. Add chicken and soak for at least 6 hours or up to 10 hours.

2. Mix the flour, corn flakes, salt, cayenne, garlic powder, paprika, and amchoor powder in a shallow bowl. Dip each piece of chicken in the flour mixture, then the beaten egg, and again in the flour mixture. Coat each piece thoroughly and set aside on a large plate.

3. Heat the oil over medium heat until hot but not smoking. The oil is ready when a speck of flour begins to immediately sizzle when it hits the oil (Another test is to place the handle of a wooden spoon into the oil -- if the oil immediately bubbles up around the handle, it is ready.) Fry the chicken 2 or 3 pieces at a time to avoid crowding the pot for about 6 minutes per side (more or less time may be required based on the size of the piece).

4. Once the chicken pieces are golden brown, remove from the oil and place on a plate covered with a few layers of paper towels to soak up the excess oil. Sprinkle with a little kosher salt if desired.

Makes 4 servings.

Friday, March 20, 2009

Coq Au Vin

I have been teased in the past by friends who find it amazing just how much I love chicken and how often I will order it at even the nicest restaurants. I think my prediliction stems from my upbringing as my mother would make chicken curry pretty much on a weekly basis for me. I also gave up red meat for several years and so I relied on chicken even more during those years. I recall during my senior year of college (part of my non-red meat eating days), when I was finally off the university meal plan, I would buy a pack of boneless, skinless chicken breast every week to cook for the week's dinner (I wasn't very adventurous back then). I was the only one of my roommates who ate any meat and there was inevitably some controversy over the "chicken bag", aka the plastic grocery bag that contained the chicken breast pack. Being a little bit more laid back about bacteria in those days, I somehow always forgot to separate out the "chicken bag" and threw it into the house's collection of plastic bags. My roommates were disgusted at the thought of inadvertantly using the "chicken bag." Now that I think about it, the ongoing "chicken bag" controversy is likely responsible for my reputation for excessively loving chicken.

I still love chicken just as much today but I try to avoid boneless, skinless chicken breast, which frankly tastes like cardboard to me these days. I have been trying to master several classic chicken recipes and have already blogged about chicken with 40 cloves of garlic and 
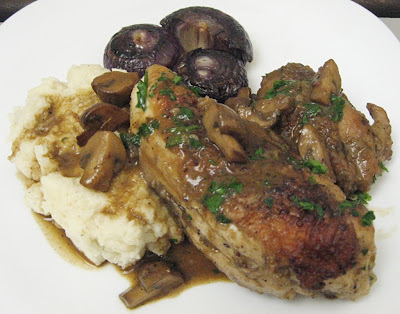
Zuni Cafe's roast chicken. Last weekend, I decided to try my hand at coq au vin, a rustic French dish traditionally made with an old rooster (while I would love to try old rooster, I made do with a whole cut up chicken). The dish is essentially a braise and perfect for the continuing dreary weather in New York (it snowed on the first day of Spring!). I used a combination of two recipes -- a Barefoot Contessa recipe I found on the Food Network site and a recipe from Molly Stevens' book, All About Braising, which I have discussed before. I used a very cheap red wine for this recipe, which did not hurt the flavor of the dish at all. I also decided to strain the sauce after the braising period for aesthetic purposes but that is completely unnecessary. I served this with mashed potatoes and roasted cipollini onions, instead of the traditional pearl onions.

Coq Au Vin

Ingredients

1 3 - 4 lbs. whole chicken, cut into eighths
4 ounces bacon, diced (I had to use turkey bacon because my husband does not eat pork)
kosher salt & pepper
1/2 lb. carrot, peeled & diced
1 yellow onion, diced
2 or 3 cloves garlic, sliced
2 Tbsp brandy
1/2 bottle (375 ml) dry red wine, such as a Burgundy
1 cup + 2 Tbsp chicken stock
1 Tbsp + 1 tsp fresh thyme
3 Tbsp fresh parsley, chopped
1 bay leaf
2 Tbsp butter
1 Tbsp tomato paste
olive oil
flour for dredging, about 1/2 cup
1/2 lb. cremini mushrooms, cut into quarters
2 Tbsp Marsala wine

Directions

1. Preheat the oven to 325°F.

2. In a large Dutch oven, cook the diced bacon over medium heat until well browned and crisp on the outside but with some softness remaining inside. If using turkey bacon, you may need to add a touch of olive oil. Transfer the bacon to a plate lined with paper towels.

3. Season the chicken all over with salt and pepper. Spread the flour on a wide shallow dish and dredge each piece of chicken, shaking off any excess flour.

4. Add one tablespoon of butter to the rendered bacon fat (if using turkey bacon, you will likely have to add a tablespoon of olive oil) and heat over medium-high heat. When the butter has melted, ease the dredged chicken pices, skin side down, without crowding the pot. Brown well on each side, around 7 to 10 minutes total, until a deep golden brown crust forms. Transfer the chicken to a large platter to catch the juices and repeat the process with all the remaining chicken pieces. Lower the heat a touch if the second batch of chicken pieces begin to burn.

5. Pour off any excess fat from the pot, and then add a tablespoon of butter and melt over medium heat. Add the onion and carrot and saute until the vegetables are beginning to soften and are flecked with brown, about 4 minutes. Add the garlic and bay leaf and cook for another minute. Add the tomato paste and smear throughout the vegetables.

6. Add the brandy and bring to a boil to deglaze, scraping the pot with a wooden spoon to dislodge the crust that should have formed at the bottom of the pot. When the liquid is almost gone, raise the heat to high and add the red wine, 1 tablespoon thyme, and 2 tablespoons of parsley and bring to a boil. Lower the heat to medium-high and simmer rapidly until the wine reduces by about half, about 15 minutes. Stir in the reserved bacon and the stock and bring to a boil.

7. Add the chicken pieces back to the pot. Make sure to place the chicken breasts back in the pot skin side down balanced on top of the other pieces (this helps prevent the breasts from drying out). Pour in any juices that collected as the chicken sat and bring to a simmer. Cover the pot and place on a rack in the lower third of the oven to braise.

8. After 15 minutes, turn the breast pieces over with a tong. At the same time, make sure the liquid is not bubbling too fiercely. If it is, lower the heat by 10 or 15 degrees. Continue to braise for another 45 minutes or until the breasts and dark meat are fork-tender.

9. While the chicken braises, heat a tablespoon of olive oil in a frying pan. Add the mushrooms and saute until they start giving off their liquid. Sprinkle with salt, pepper, and thyme. Once the liquid is almost evaporated, add 2 tablespoons of chicken stock. Once the chicken stock evaporates, add the Marsala wine and saute until the mushrooms are browned nicely.

10. When the chicken is fork-tender and pulling away from the bone, transfer the chicken to a deep platter or serving dish and cover loosely with foil to keep warm. Let the braising liquid settle for a moment and then, with a wide spoon, skim off as much surface fat as you can without being overly fastidious. Strain the solids out of the braising liquid and return the liquid to pot. Place the pot over high heat and bring the juices to a boil. Reduce the juices until thickened to the consistency of a vinaigrette, about 10 minutes. Lower the heat and add the mushroom mixture. Spoon the sauce over the chicken pieces, sprinkle with the remaining chopped parsley, and serve.

Makes 4 servings.

Tuesday, March 17, 2009

Apple Spice Bars


I promise that this will be the last dessert post for awhile. I realize that I have been rather delinquent in posting recipes for anything that could constitute a real meal and my husband is getting a little sad that every time he expects say, coq au vin (something I will be posting about soon), he is instead presented with a sweet treat. As the winter season finally winds down, this is my last chance to bake up a storm in my kitchen. Once allergy season hits, all bets are off on whether I will even step into the kitchen.

Anyway, my latest baking foray were these apple spice bars. Because making homemade pastry crusts still intimidate me, I figured this is the closest I would get to a homemade apple pie. The bars turned out to be a cross between an apple pie and a blondie, which certainly is not a bad thing. The flavor actually improved on the second day. However, I did not love the consistency -- the bars were slightly too moist and sticky, to the point that they were falling apart. By the third and fourth day, they were almost a pile of mush. I actually used pourable light brown sugar in place of dark brown sugar, which I thought would lower the moisture content of the bars. I imagine that dark brown sugar might make these bars way too soft. My suggestion -- bake them and eat them all by the second day! As usual, I halved the recipe and the halved version appears below.

Apple Spice Bars

Ingredients

1 c. plus 1 Tbsp all purpose flour
1 tsp baking powder
1/8 tsp salt (I added a touch more)
1 tsp ground cinnamon
1/16 tsp nutmeg (I added a touch more)
1/16 tsp allspice (I used ginger instead)
small pinch ground cloves
1/4 c. butter, melted
1/2 c. packed brown sugar (as I mentioned, I used pourable light brown sugar)
1/2 c. white sugar
1 egg
1/2 Tbsp vanilla extract
1 apple, cored and diced (a little less than 1 c.)
cinnamon sugar for sprinkling

Directions

1. Preheat oven to 350°F and line 8x8 pan with parchment paper.

2. In a medium bowl, combine flour, baking powder, salt, cinnamon, nutmeg, allspice, and cloves. Whisk to combine well and set aside.

3. In a large bowl, combine sugars and butter and beat until light and fluffy.

4. Add egg beating well to combine. Add vanilla extract and beat to combine. Fold in flour mixture a little at a time until just combined. Fold in apples.

5. Spread mixture evenly into prepared pan and sprinkle top generously with cinnamon sugar.

6. Place in oven and bake until cooked through, when top slightly bounces back to the touch, about 30 minutes. Remove from oven and let cool completely before removing from pan, cutting and serving. (Bars will be very soft.)

Makes 9 large or 12 small(er) bars.

Sunday, March 8, 2009

Chocolate Biscotti

Biscotti was an acquired taste for me. I generally prefer soft, chewy cookies and I am not a huge fan of some of the flavors that are traditionally used for biscotti, like anise. Thus, I steered clear of the biscotti that was sold in the myriad of Italian bakeries in the Long Island town in which I grew up. However, over the years, I became a little bit more adventurous and grew to like the satisfying crunch of biscotti. I drink my share of tea and coffee and there is very little more satisfying than biscotti dunked in an afternoon cup. It doesn't hurt that biscotti are a teensy tiny bit healthier than other cookies because most recipes do not require any butter.

I found this recipe on my favorite online dessert chef's, David Lebowitz, fabulous blog. I was sorely tempted to forego baking the cookies a second time to keep the cookies chewy. However, biscotti once-baked isn't really biscotti at all (biscotti refers to "twice-baked" in Italian). In the end, these biscotti were very tasty but perhaps a little too hard and, thus, I would reduce the amount of time for the second baking. It is worth noting that the dough is extremely stiff so it may take some work shaping it into logs. I again halved the recipe without a problem and I have reproduced the halved version below.

Chocolate Biscotti

Ingredients

1 cup flour
1/4 cup + 2 Tbsp top-quality cocoa powder
1/2 tsp baking soda
1/8 tsp salt
1 1/2 large eggs, at room temperature
1/2 cup sugar
1/2 tsp vanilla extract
1/4 tsp almond extract (I just used vanilla extract instead)
1/2 cup almonds, toasted and very coarsely-chopped (I omitted this because of my husband's nut allergies)
1/4 cup + 2 Tbsp chocolate chips

For the glaze

1/2 large egg
1 Tbsp coarse sugar

Directions

1. Preheat the oven to 350°F degrees.

2. In a small bowl, sift together the flour, cocoa powder, baking soda, and salt.

3. In a large bowl, beat together the 1 1/2 eggs, sugar, and vanilla and almond extracts. Gradually stir in the dry ingredients, then mix in the nuts and the chocolate chips until the dough holds together.

4. Line a baking sheet with parchment paper or a silicone mat. Roll the dough into one log the length of the baking sheet (I couldn't stretch mine quite so far).

5. Gently flatten the tops of the logs. Beat the remaining egg and brush the tops of the logs liberally with the egg. (You won't use it all). Sprinkle the tops with the coarse or crystal sugar and bake for 25 minutes, until the dough feels firm to the touch.

6. Remove the cookie dough from the oven and cool 15 minutes. On a cutting board, use a serrated bread knife to cut the cookies into 1/2-inches slices. Lay the cookies cut side down on baking sheets and return to the oven for 20 to 30 minutes (I would halve this time), turning the baking sheet midway during baking, until the cookies feel mostly firm.

Note: Once baked, cool the cookies completely then store in an airtight container for up to two weeks.

Makes 15 - 20 cookies.

Saturday, February 28, 2009

Jam Cookies

I have a confession to make -- I am officially obsessed with baking. I have gone from scoffing at recipes for sweet treats to bookmarking so many of those same recipes that if I actually made all of them, my husband and I probably wouldn't fit on our bed. I don't know what caused this turn from savory to sweet -- I just know that last week, I turned not once but twice to baking when I was feeling a little bit blue. These jam cookies were the result of one of my baking flurries. The recipe is from Joy the Baker. It is the type of recipe that is perfect for when you are itching to bake but you don't have a lot of special ingredients lying around. My husband loved the jam flavor in the cookies and I loved the delicate pink color of the cookies. I used strawberry jam but you can, of course, use any type of thick jam you happen to have in the refrigerator. My husband's suggestion for next time is to pipe some jam into the middle of the cookies so you have a little bit of a surprise when you bite into the cookies. I promise to share if I am able to figure out a way to make this jam filling idea work. The recipe is slightly altered from the original. I was able to halve the recipe with no problem.

Jam Cookies

Ingredients

2 cups all-purpose flour
1 teaspoon baking powder
1/2 teaspoon ground ginger
1/4 teaspoon salt
1 stick (8 tablespoons) unsalted butter, at room temperature
2/3 cups sugar, plus more for coating the cookies
1 egg
2 tablespoons milk (I used fat free half-and-half)
1/2 teaspoon vanilla extract
1/4 cup of strawberry jam, or any thick jam you have on hand

Directions

1. Position the racks to divide the oven into thirds and preheat the oven to 375°F. Line two baking sheets with parchment or silicone mats.

2. Whisk together the flour, baking powder, ginger and salt.

3. Beat the butter until creamy and smooth. Add the sugar and beat for a minute. Add the egg and beat for 2 minutes more. The mixture will be satiny. Add the milk and vanilla and beat just to combine. Don’t be concerned if the mixture looks curdled, it will even out shortly. Add the jam and beat for 1 minute more. Add the dry ingredients and mix only until they are incorporated.

4. Spoon the dough by the rounded teaspoonfuls into a dish of granulated sugar. Toss to coat and place on a baking sheet, leaving about an inch between the mounds.

5. Bake the cookies for 10 to 12 minutes. The cookies will be only just firm, fairly pale and browned around the edges. Pull the sheets from the oven and allow the cookies to rest for 1 minute, the carefully transfer them to racks to cool to room temperature.

Re-Discovering Broccoli

I have always liked broccoli. Even when I was a kid, I never complained if there was broccoli on the dinner table like I would if I discovered squash or cabbage was on the menu. In college, I bought broccoli nearly every week and threw stray florets into serviceable stir fries or omelets. However, broccoli was never something I put in my shopping cart because I was excited about it. It was never the star of any dish I made. All of that changed when I saw this post on the Amateur Gourmet site. The Barefoot Contessa recipe highlighted seemed simple enough -- season broccoli with some salt, pepper, and garlic; roast until crispy and brown; toss with lemon zest and lemon juice; sprinkle with pine nuts and grated parmesan. Somehow, the sum of this dish is much, much greater than its parts. I have made broccoli this way countless times and it never fails to please. Roasting carmelizes the broccoli and results in delightfully crispy, browned spots on the florets. I can't imagine making broccoli any other way. This recipe allows broccoli to be the star for once.

Roasted Broccoli

Ingredients

2 bunches broccoli
4 garlic cloves, sliced
salt & pepper
zest of one lemon
juice of 1/2 lemon
parmesan, grated
pine nuts, toasted
olive oil

Directions

1. Preheat oven to 425°F.

2. Wash and pat the broccoli very dry. Cut into large florets. Toss with a glug of olive oil, garlic, salt and pepper. Roast on a baking sheet for 20 to 25 minutes.

3. Remove from oven and toss with lemon zest and lemon juice. Top with pine nuts and parmesan.

Note: The original recipe also calls for julienned basil but I have always omitted it.

Makes 4 servings.

Sunday, February 22, 2009

Twice Baked Potato

There are very few foods I love as much as the humble potato. My mother famously once told me that "If you keep eating so much potato, you will start looking like a potato." Sage advice indeed but sometimes I just have to have a baked potato slathered in butter and salt. Twice baked potatoes, of course, are even better. There are endless variations of ingredients you can throw into a twice backed potato -- my constants are butter, light cream, salt, and some sort of cheese. The Simply Recipes site has some good ideas. For the potatoes pictured in this post, I used freshly grated parmesan cheese (my husband's brilliant idea) and turkey bacon. The trick to light fluffy potatoes, is to bake the potatoes for at least an hour with a light rubbing of olive oil and salt. The salt draws out the moisture and the skin gets somewhat crispy. I used to get impatient and underbake the potatoes, which just results in potatoes that refuse to mash well and end up gluey. The recipe below is based on Elises's recipe but I don't include exact measurements for some of the ingredients below as they will vary by taste.

Twice Baked Potatoes

Ingredients

2 large Russet potatoes
olive oil
kosher salt
freshly ground black pepper
freshly grated parmesan cheese
light cream
2 - 3 strips turkey bacon

Directions

1. Preheat oven to 400°F. Wash and scrub the potatoes and dry with a paper towel. Prick the potatoes a few times with a fork. Rub with a little olive oil and sprinkle all over with kosher salt. Place on a baking sheet and bake for at least an hour and until the potatoes are cooked through.

2. In the meantime, heat the turkey bacon strips over medium heat until crispy. Crumble and set aside.

3. Remove potatoes from oven and allow to cool somewhat for easy handling. Lower oven temperature to 350°F. Cut off top third of each potato. Scoop out insides but leave about 1/4 inch of potato all around so the potatoes hold their shape.

4. Mash the insides of the potatoes with light cream, salt, 3/4 of grated parmesan cheese, and 2/3 of the crumbled bacon. Add the ingredients to taste and don't overmix as the potato will get gluey.

5. Scoop the mashed potatoes back into the potato skins and top each with remaining turkey bacon crumbles and parmesan cheese. Bake for an additional 15 minutes before serving.

Makes 2 servings.

Tuesday, February 17, 2009

Harissa Spaghetti

I never would have thought to combine harissa and pasta until I ran into this recipe on the 101 Cookbooks website. The combination of Mediterranean ingredients and harissa in this recipe is ingenious -- it is light and healthy, but also hearty and extremely tasty. Although I admit that I don't like making practical weeknight food, I think this recipe qualifies but still keeps things interesting.

Harissa is one of my favorite ingredients though but, for some reason, I don't use it nearly often enough. The harissa I used for this recipe wasn't too spicy so I was able to use quite a bit for the sauce. I echo Heidi's advice to taste the harissa you intend to use first as pre-made harissa can vary greatly and many are extremely spicy. I also think whole wheat pasta works great for this recipe as it can stand up to bold flavors. I am a late convert to whole wheat pasta and still don't use it for every pasta recipe. However, I have been pleased with the taste and consistency of Trader Joe's Organic Whole Wheat Spaghetti. As usual, I have reproduced the recipe below with a few of my own alterations.

Harissa Spaghetti

Ingredients

4 - 5 medium cloves garlic, peeled
a big pinch of fine grain sea salt
1/4 cup plus 3 Tbsp extra virgin olive oil
3 Tbsp harissa (paste)
8-10 ounces (or a little more than 1/2 pound) whole wheat spaghetti
1 small bunch kale, well-washed, deveined, and torn into smaller pieces
1/2 cup oil-cured black olives pitted
1/2 cup pine nuts, toasted
zest of 1 lemon
squeeze of lemon

Directions

1. Bring a big pot of water to a boil. Whisk together the harissa and 1/2 cup plus 2 tablespoons olive oil with a big pinch of salt and set aside.

2. Heat remaining tablespoon of olive oil over medium heat. Add garlic and saute until fragrant. Add kale and a small pinch of salt and saute until softened. Add half the harissa/olive oil sauce and heat.

3. Add the spaghetti and cook until al dente. Add the cooked spaghetti with a touch of pasta water to the heated sauce. Add the olives, lemon zest, and the remaining sauce and toss to combine. Add a squeeze of lemon and scatter the pine nuts.

Makes 4 servings.

Sunday, February 15, 2009

Chicken with 40 Cloves of Garlic

I have been dying to make Ina Garten's, better known as the Barefoot Contessa, recipe for chicken with 40 cloves of garlic ever since I saw this post on the Amateur Gourmet site. I adore garlic and throw it into almost every savory recipe, whether or not it calls for garlic. However, for some reason, when I first brought up the recipe to my husband, he was hesitant about it. According to him, several months later, when he suggested making the recipe, I was in turn hesitant about it because I thought it could be bland. So, this recipe languished for over a year in my recipe book. All this hesitation was ultimately pointless as the chicken was phenomenal!

It is amazing how just a few ingredients combine and concentrate to create such heightened flavors. Don't be afraid of the amount of garlic this recipe calls for as the garlic really mellows out, becoming almost sweet, during the cooking process. Although the recipe states that the chicken is "bland" without the sauce, I found the chicken to be very chicken-y, in a good way. I briefly considered omitting the Cognac as it required buying an overpriced tiny bottle just for the recipe but I am glad that I ended up splurging because it adds a great dimension to the dish. I also recommend using fresh thyme, as the flavor was also very evident in the final product. Finally, make sure to season the chicken thoroughly and be very patient with the initial browning as that is when most of the flavor is developed (as in most if not all braising dishes). I served this dish with roasted baby potatoes, flavored with some of the remaining fresh thyme and the Christmas truffle salt, and roasted broccoli, which deserves and will soon get its own post.

Chicken with 40 Cloves of Garlic

Ingredients

3 whole heads garlic, about 40 cloves
2 (3 1/2-pound) chickens, cut into eighths (I used just one chicken)
Kosher salt
Freshly ground black pepper
1 tablespoon unsalted butter
2 tablespoons good olive oil
3 tablespoons Cognac, divided
1 1/2 cups dry white wine
1 tablespoon fresh thyme leaves
2 tablespoons all-purpose flour
2 tablespoons heavy cream (I used light cream)

Directions

1. Separate the cloves of garlic and drop them into a pot of boiling water for 60 seconds. Drain the garlic and peel. Set aside. (I cheated and used pre-peeled cloves of garlic I got from Trader Joe's, which did not hurt the flavor of the dish at all and saved me a ton of time and frustration.)

2. Dry the chicken with paper towels. Season liberally with salt and pepper on both sides. Heat the butter and oil in a large pot or Dutch oven over medium-high heat (If you are making just one chicken like I did, use half the amount of butter and oil. The chicken will give off plenty of its own fat). In batches, saute the chicken in the fat, skin side down first, until nicely browned, about 3 to 5 minutes on each side. Turn with tongs or a spatula; you don't want to pierce the skin with a fork. If the fat is burning, turn the heat down to medium. When a batch is done, transfer it to a plate and continue to saute all the chicken in batches. Remove the last chicken to the plate.

3. Add all of the garlic to the pot. Lower the heat and saute for 5 to 10 minutes, turning often, until evenly browned. Add 2 tablespoons of the Cognac and the wine, return to a boil, and scrape the brown bits from the bottom of the pan. Return the chicken to the pot with the juices and sprinkle with the thyme leaves. Cover and simmer over the lowest heat for about 30 minutes, until all the chicken is done.

4. Remove the chicken to a platter and cover with aluminum foil to keep warm. In a small bowl, whisk together 1/2 cup of the sauce and the flour and then whisk it back into the sauce in the pot. Raise the heat, add the remaining tablespoon of Cognac and the cream, and boil for 3 minutes. Add salt and pepper, to taste; it should be very flavorful because chicken tends to be bland. Pour the sauce and the garlic over the chicken and serve hot.

Makes 4-6 servings.

Chile Peanuts

My husband surprised me last year with a subscription to Gourmet magazine. I really like Gourmet's mix of travel and food writing and, of course, the beautiful food photography. As for the recipes, I have generally been successful with the ones that I have tried. I have to admit that I am usually only intrigued by an average of 2 or 3 recipes per issue (just due to personal taste) and try even less, maybe 1 per issue. Part of the reason is that I bombard myself with recipes from food blogs, which I often find to be even more reliable than food magazines, and it is not humanly possibe to make everything I want to try! This recipe is the first recipe from Gourmet that I tried and it is definitely a success. It is not too spicy and is just the right mix of tangy and hot. As usual, I halved the recipe. The peanuts keep in an airtight container for up to 3 weeks and can be reheated in a 250°F oven for 15 to 20 minutes.

Chile Peanuts

Ingredients

1 1/4 Tbsp fresh lime juice
1 Tbsp olive oil
1 1/2 tsp paprika
1 tsp fine sea salt
1/2 tsp cayenne
2 cups unsalted dry-roasted peanuts

Directions

1. Preheat oven to 250°F with rack in middle.

2. Whisk together lime juice, oil, paprika, sea salt, and cayenne. Stir in peanuts to coat evenly.

3. Spread peanuts in a large shallow baking pan and bake until coating is dry and fragrant, about 30 minutes. Cool completely before serving.

Sunday, February 8, 2009

Blueberry Crumb Bars

This is one of those desserts that looks very impressive but is incredibly easy to make. I first saw these blueberry crumb bars on Smitten Kitchen. They looked so pretty that I had to try them right away and, boy, were they good! I now have made them 3 different times, and each time, they have been a huge success. I have also been able to halve the recipe without any problem (the halved version is reproduced below). A lot of the comments on the Smitten Kitchen post mentioned that this recipe is easily adaptable and can be made with cranberries or raspberries and with orange zest and juice. I am eager to try the variations.

I probably should have mentioned before now that I do not own a stand mixer so every dessert I highlight on this blog easily can be made by hand. In fact, if a recipe seems to require a stand mixer, I tend to avoid it. This recipe, thankfully, does not call for a stand mixer or a huge list of ingredients. Just one tip -- I have found that grating the butter is the easiest way to incorporate it into the flour/sugar/baking powder mixture. The butter needs to be very cold before grating. The technique is a little messy but has never failed to produce perfect crumbly dough.

Blueberry Crumb Bars

Ingredients

½ cup white sugar
½ tsp baking powder
1½ cups all-purpose flour
½ cup cold butter (1 stick)
½ egg
⅛ tsp salt
Zest and juice of ½ lemon
2 cups fresh blueberries
¼ cup white sugar
2 tsp cornstarch

Directions

1. Preheat oven to 375°F. Line a 8X8 inch square pan with parchment paper.

2. In a bowl, stir together ½ cup sugar, 1½ cups flour, and baking powder. Mix in salt and lemon zest. Use a fork to blend in the butter and egg. Dough will be crumbly. Pat half of dough into the prepared pan.

3. In another bowl, stir together ¼ cup sugar, cornstarch, and lemon juice. Gently mix in the blueberries. Sprinkle the blueberry mixture evenly over the crust. Crumble remaining dough over the berry layer.

4. Bake in preheated oven for 45 minutes, or until top is slightly brown. Cool completely before cutting into squares.

Makes about 12 squares.

Saturday, February 7, 2009

Scallion Pancakes and Shrimp Fried Rice

Two dishes I never order from Asian restaurants anymore are scallion pancakes and fried rice as I find both are usually too greasy. So, if I ever get a hankering for either, both of which are quick and use ingredients I often have lying around, I have to make them at home. The pancake recipe below is for a version of Korean Pajeon, and not for scallion pancakes that are usually served at Chinese restaurants, which I found on David Lebowitz's site. My favorite part of the recipe is the egg that is swirled into the pan and cooked until the edges are crispy. I have made the Pajeon with cut-up shrimp with great success. The batter is a little thick, so make sure to nudge the batter all around the pan. I serve the Pajeon with a simple sauce of soy sauce with a touch of rice wine vinegar and sesame oil.

I can't say that I follow a set recipe for fried rice every time I make it or that my version is very authentic. I have made fried rice so often that I just tend to throw in whatever I have on hand and season to taste. However, I do recommend that you read this great post by Jaiden Hair of Steamy Kitchen on the Simply Recipes blog. Jaiden gives several useful tips on how to avoid making fried rice that is too mushy or goopy. One of her cardinal rules is to use day old rice, which I have to admit, I don't always do if I don't plan ahead. For my version, I use a lot of soy sauce, add some sambal oelek because I like the heat, add garlic and ginger, and use basmati rice because it is usually what I have on hand and because it is very close to jasmine rice.

Korean Pancake

Ingredients

1/2 cup all-purpose flour
1/2 cup ice-cold water
1/2 tsp salt
1 large or extra-large egg, lightly beaten
1 bunch of scallions
soy sauce
optional: cut up shrimp
oil, for frying
white wine vinegar
sesame oil

Directions

1. Stir together the flour, water and salt until just mixed.

2. Chop the green parts of the scallions into 3-inch lengths. Reserve the white parts for another use.

3. Heat a thin layer of oil in a 9 or 10-inch skillet, preferably non-stick, until hot. Fry the scallions until they're completely cooked through and soft. Add a touch of soy sauce to the pan when they're almost done, to season the scallions.

4. If using other ingredients, such as shrimp — add them now, then toss a few times to heat them through.

5. Pour the pancake batter over the scallions (and other stuff in the pan), spreading the batter, and cook a few minutes until the bottom is nice and brown underneath. Lift the edge to peek.

6. Pour the beaten egg on top then swirl the pan to even out the egg a bit, still keeping it pretty uneven, and cook until the egg is just beginning to firm near the edges.

7. Using a wide spatula, flip the pancake and cook for another minute or two until the egg is set and preferably crispy at the edges.

8. Slide pancake onto a cutting board, then cool to room temperature. Cut into six or eight wedges, and serve with dipping sauce made by mixing 3 parts soy sauce with 1-2 parts rice vinegar and a few drops of sesame oil. A bit of chile oil can also be added.

Makes one 9-inch pancake.

Shrimp Fried Rice

Ingredients

8 ounces small raw shrimp, shelled and deveined
2 tablespoons cooking oil, divided
3 eggs, beaten
3 cloves garlic, chopped
1 1/2 tsp grated ginger
2 stalks green onion, minced
3 cups leftover rice, grains separated well
3/4 cup frozen peas
1/4 cup cilantro, chopped (optional; this ingredient is sometimes used in fried rice served at Indian Chinese restaurants)
soy sauce
sambal oelek
1 teaspoon sesame oil

Method

1. Heat a wok or large sauté pan on high heat. When the pan is hot enough for a bead of water to instantly sizzle and evaporate, add just 1 tablespoon of the cooking oil and swirl to coat pan.

2. Add the shrimp, quickly spreading out around the cooking surface area so that they are not overlapping. Add a touch of soy sauce to taste and stir fry until about 80% cooked through (the shrimp should have just turned pink). Remove the shrimp from the pan onto a plate.

3. Turn the heat to medium, let the pan heat up again. Add the eggs, stirring in a quick motion to break up and scramble the eggs. When the eggs are just cooked through, dish out of the pan into the same plate as the cooked shrimp.

4. Use paper towels to wipe the same wok or sauté pan clean and return to high heat with the remaining 1 tablespoon of cooking oil, swirling to coat. When the oil is very hot, add the green onions, garlic, and ginger and fry until fragrant. Add in the rice and stir well to mix in the garlic, ginger, and green onions throughout. Spread the rice all around the wok surface area and let the rice heat up, untouched until you hear the bottoms of the grains sizzle, about 1-2 minutes. Use the spatula to toss the rice, again spreading the rice out over the surface of wok.

5. Drizzle the soy sauce all around the rice and toss. Add the peas, the cooked eggs, shrimp, cilantro (if using), and sesame oil, tossing to mix the rice evenly with all of the ingredients. Let everything heat back up again. Taste and add sambal oelek and soy sauce to taste.

Makes 4 to 6 servings.

Tuesday, February 3, 2009

Arroz Con Pollo


One of my husband's absolute favorite dishes is arroz con pollo. For years, he begged me to make it for him on a regular basis and though I tried many times, I could never find a recipe that I thought was a keeper. For example, Tyler Florence's recipe is perfectly serviceable, except that it calls for way too much cumin and I disliked the consistency of the chicken. I have also tried recipes that call for the addition of beer like this one, which really did not work for me as the alcohol overwhelms the taste of the dish. I think the problem is that arroz con pollo is such a staple in so many latino households, that every family has their own recipe, which varies not only by taste but also by each family's regional roots.

I finally hit upon the perfect recipe for my husband's and my tastes when I took matters into my own hands and created a recipe that is a hybrid of two recipes -- a 2007 recipe from Gourmet highlighted on Smitten Kitchen and an America's Test Kitchen recipe. Both recipes had aspects I liked and disliked so I had a lot to draw from. My version of arroz con pollo, which I fully admit likely is not very authentic, makes a lot -- we ate this for 3 days straight and still had some leftover. This is the type of recipe that gets better overnight so leftovers are not a problem.
Arroz Con Pollo

Ingredients

1 3 1/2 - 4lbs whole chicken, cut up into 8 pieces
6 medium garlic cloves, minced
1 1/2 tsp dried oregano
1 Tbsp plus 2 tsp distilled white vinegar
ground black pepper
3 1/4 tsp salt, plus more to taste
2 Tbsp olive oil
1 medium onion, chopped fine (about 1 cup)
1 green, red, yellow, or orange pepper, chopped fine
1/4 cup cilantro, minced
1 3/4 cup chicken stock
3/4 cup water
1/4 tsp cayenne
1/2 tsp cumin
1 tsp paprika
1 or 2 bay leaves
1 can (8 oz.) tomato sauce
3 cups long grain rice
1/2 cup green olives stuffed with jalepenos, halved
2 Tbsp capers
1/2 cup jarred pimentos, cut into strips

Directions

1. Mash one-half the minced garlic with 2 tsp of salt, then transfer to a large bowl. Stir in 1 tablespoon of vinegar and 1 teaspoon oregano. Toss chicken with marinade until coated and marinate, covered and chilled, for at least 15 minutes and up to 2 hours.

2. Heat 1 tablespoon of olive oil in a large pot over medium heat. Add onions, bell pepper, and the rest of the garlic. Saute until softened, about 4 to 5 minutes.

3. Add cumin, cayenne, oregano, paprika, 1/2 tsp oregano, 1 1/4 tsp salt, and bay leaves. Cook, stirring, 1 minute. Add 2 tablespoons of cilantro and stir to combine.

4. Push vegetables to side of the pot and add half the chicken pieces skin side down. Increase heat to medium high heat. Cook without moving chicken, until outer layer becomes opaque, 2 to 4 minutes. Using tongs, flip chicken and cook on second side until opaque, another 2 to 4 minutes. Remove chicken to a platter. Repeat same process with remaining chicken pieces.

5. Add rice to the vegetables and saute together for 30 seconds. Add broth, tomato sauce, and water; stir to combine. Bring to a simmer.

6. Lower heat to medium low heat. Scatter olives and capers. Nestle chicken pieces throughout the rice. Cover pot with parchment paper and a tight lid. Allow to cook for 20 to 30 minutes, stirring once or twice. If liquid seems to evaporate too quickly, add a small amount of chicken broth.

7. Once the chicken and rice are cooked through, turn off heat. Remove chicken pieces from pot. Remove chicken skin and discard. Using two spoons, remove the meat from the bones and discard bones. Toss chicken meat with remaining cilantro, 1 tablespoon olive oil, 2 teaspoons vinegar, and salt to taste.

8. Add the chicken back to the rice and stir. Scatter pimento strips. Taste for seasoning and add salt to taste if necessary.

Makes 6-10 servings.

Wednesday, January 28, 2009

Dulce de Leche Brownies

A few years ago, my husband asked me to make a dessert for an office holiday party. At that time, I rarely ever cooked let alone baked. So, I decided that I would doctor up box mix brownies with some peanut butter chips. The box mix that I chose called for a good amount of oil. All I had in the pantry, other than some olive oil, was a five year old bottle of vegetable oil. It seemed to smell a little funky but I thought, "I've never heard of oil going bad" and used it anyway. This was not one of my better ideas. The brownies came out extremely oily and smelled really bad -- it was like they came out of the oven already stale! Needless to say, my husband did not win "best dessert" that year at his office party. Since then, I enjoyed the occasional decadent Fat Witch brownie but never really thought to try to bake my own. All that changed when I ran into this recipe from David Lebowitz. Not only were David's pictures irresistible, he also included a great touch -- homemade dulce de leche!

The Amateur Gourmet has a great post about how easy it is to make the dulce de leche. It really is a foolproof recipe -- I could not stop sneaking little tastes of the dulce de leche before I dolloped it into the brownie batter. As for the brownies themselves, they were very tasty and not too sweet because I used bittersweet chocolate. Make sure to store the brownies in an airtight container so they do not dry out. Enjoy!

Dulce de Leche Brownies

Ingredients

8 tablespoons salted or unsalted butter, cut into pieces
6 ounces bittersweet or semisweet chocolate, finely chopped
1/4 cup unsweetened Dutch-process cocoa powder
3 large eggs
1 cup sugar
1 tsp vanilla extract
1 cup flour
1 cup toasted pecans or walnuts, coarsely chopped (I omitted this)
1 cup Dulce de Leche (or Cajeta)

Directions

1. Preheat the oven to 350° F.

2. Line a 8-inch square pan with a long sheet of aluminum foil that covers the bottom and reaches up the sides. If it doesn't reach all the way up and over all four sides, cross another sheet of foil over it, making a large cross with edges that overhang the sides. Grease the bottom and sides of the foil with a bit of butter or non-stick spray.

3. Melt the butter in a medium saucepan. Add the chocolate pieces and stir constantly over very low heat until the chocolate is melted. Remove from heat and whisk in the cocoa powder until smooth. Add in the eggs one at a time, then stir in the sugar, vanilla, then the flour. Mix in the nuts, if using.

4. Scrape half of the batter into the prepared pan. Drop one-third of the Dulce de Leche, evenly spaced, over the brownie batter, then drag a knife through to swirl it slightly. Spread the remaining brownie batter over, then drop spoonfuls of the remaining Dulce de Leche in dollops over the top of the brownie batter. Use a knife to swirl the Dulce de Leche slightly.

5. Bake for 35 to 45 minutes. The brownies are done when the center feels just-slightly firm. Remove from the oven and cool completely.

Makes about 12 brownies.

Dulce de Leche

Ingredients

1 can (14 oz.) sweetened condensed milk
sea salt

Directions

1. Preheat the oven to 425° F.

2. Pour one can of sweetened condensed milk (not evaporated milk) into a glass pie plate or shallow baking dish. Stir in a few flecks of sea salt.

3. Set the pie plate within a larger pan, such as a roasting pan, and add hot water until it reaches halfway up the side of the pie plate.

4. Cover the pie plate snugly with aluminum foil and bake for 1 to 1¼ hours. (Check a few times during baking and add more water to the roasting pan as necessary).

5. Once the Dulce de Leche is nicely browned and caramelized, remove from the oven and let cool. Once cool, whisk until smooth.

6. Store in the refrigerator until ready to serve. Warm gently in a warm water bath or microwave oven before using.

Sunday, January 25, 2009

Smoked Salmon, Carmelized Onion and Gruyere Melt

I haven't quite gotten to the point in my cooking career where I feel comfortable making up my own recipes. But, the one thing I can create on my own are sandwiches. This sandwich is very easy to make but requires quite a bit of time because of the onions. I slowly carmelize them over low heat for about an hour. This might seem like a lot of work for a sandwich, but it really is worth it. My husband is such a fan that he requests it at least once a month. Just make sure to use good quality cheese.

Smoked Salmon, Carmelized Onion and Gruyere Melt

Ingredients

Smoked salmon, 4 ounce pack
2 medium onions, sliced
1/4 - 1/3 lb gruyere, grated
4 slices, good quality sandwich bread
oil
butter
salt & pepper

Directions

1. Heat oil in a medium pot over medium low heat. Add the onions, stir, and allow to cook for 15 minutes. Sprinkle with salt and pepper and stir. Continue cooking for another 45 minutes or until the onions are golden, soft, and sweet. If the onions start to burn, lower heat.

2. Heat a non-stick frying pan over medium heat. Butter one side of each slice of the bread and place 2 slices buttered-side down in the pan.

3. Working quickly, top each slice with a layer of gruyere, smoked salmon, carmelized onion, and another layer of gruyere. Place the second slice of bread on top of each sandwich.

4. Once the bottom slice of bread is browned, carefully flip each sandwich. If the cheese is not melting, place the cover on the frying pan briefly. Remove from the heat and serve once the second side of each sandwich is browned.

Makes 2 servings.

Indian Brunch

I have always wondered why Indian restaurants do not offer brunch on weekends instead of those all-you-can-eat buffets that are rarely good. There are so many brunch-worthy foods eaten for breakfast on the Subcontinent that it seems like an obvious business strategy to me. My husband often begs me to make him an Indian brunch on the weekends. Unfortunately, as I have mentioned before, I am still not very good at a lot of basic Indian dishes and so, I am usually at a loss. I still have not tried to make many of the Indian breads that are often eaten for breakfast, such as roti, paratha, and luchi (or puri). And, despite the photograph, I still have not learned how to make these breads. The paratha in this picture is courtesy of my mother-in-law, who actually gave me prepared balls of dough. All I did was roll them out and fry them in some olive oil (cooking oil or ghee is more traditional). And, despite all the help, they still came out only . . . ok. I did, however, make some great accompaniments -- aloo bhaja (or fried potatoes) and an Indian-style omelet.

Practically every region of India has a recipe for aloo bhaja. I made the Bengali version, which is very simple and requires only 4 ingredients. My only caveat is to watch how much turmeric you use -- I always use less than called for in any given recipe as I find that too much makes a dish too bitter (I also had trouble keeping the potatoes from flying out of the frying pan, resulting in a yellow-spattered stove top). There is also not much to the Indian-style omelet. What makes the omelet "Indian-style" is less the ingredients than the style of cooking the eggs. Indian omelets are usually made with oil, rather than butter, at a higher temperature, and are usually cooked through (not at all runny). Below are very loose "recipes" for the aloo bhaja and omelet

Aloo Bhaja

Ingredients

1 large russet potato, peeled and cut into matchsticks
a pinch of turmeric
salt & pepper
1 dried red chili pepper (optional)
oil

1. Heat oil over medium high heat. Add the dried red chili pepper, if using, and stir until it turns an even deeper red.

2. Add the potatoes and sprinkle with salt, pepper, and turmeric. Stir and fry until the potatoes are cooked through.

Makes 2 servings

Indian-style Omelet

Ingredients

3 large eggs
1/2 small onion, diced
2 small green chilies, diced (can also be seeded)
a few sprigs cilantro, finely chopped (optional)
salt & pepper
oil

Directions

1. Whisk together all the ingredients except the oil.

2. Heat the oil over medium high heat. Add the egg mixture. Let it set for a second (it should start cooking immediately). Then, fold the egg over itself and flip until cooked through.

Makes 2 servings.